The Amir family emigrated from Sana’a, Yemen to Tel Aviv in 1930. In the following years, Pini Amir told me, the family kept to Yemenite food, which included a bone marrow soup, hilbeh (a fenugreek condiment) and a large homemade flatbread called saluf for lunch every single day of the week. This combination is Pini’s favorite meal to this day.
“We had a taboon (traditional Arab clay oven) on the roof where my two grandmothers used to bake saluf for the weekend,” he recalled. The grandmothers used firewood to create coal and then baked saluf with the heat of the coal. Back in Yemen, the family had a similar taboon built outdoors, and today, Pini has one at his home in Moshav Beit Itzhak in central Israel.
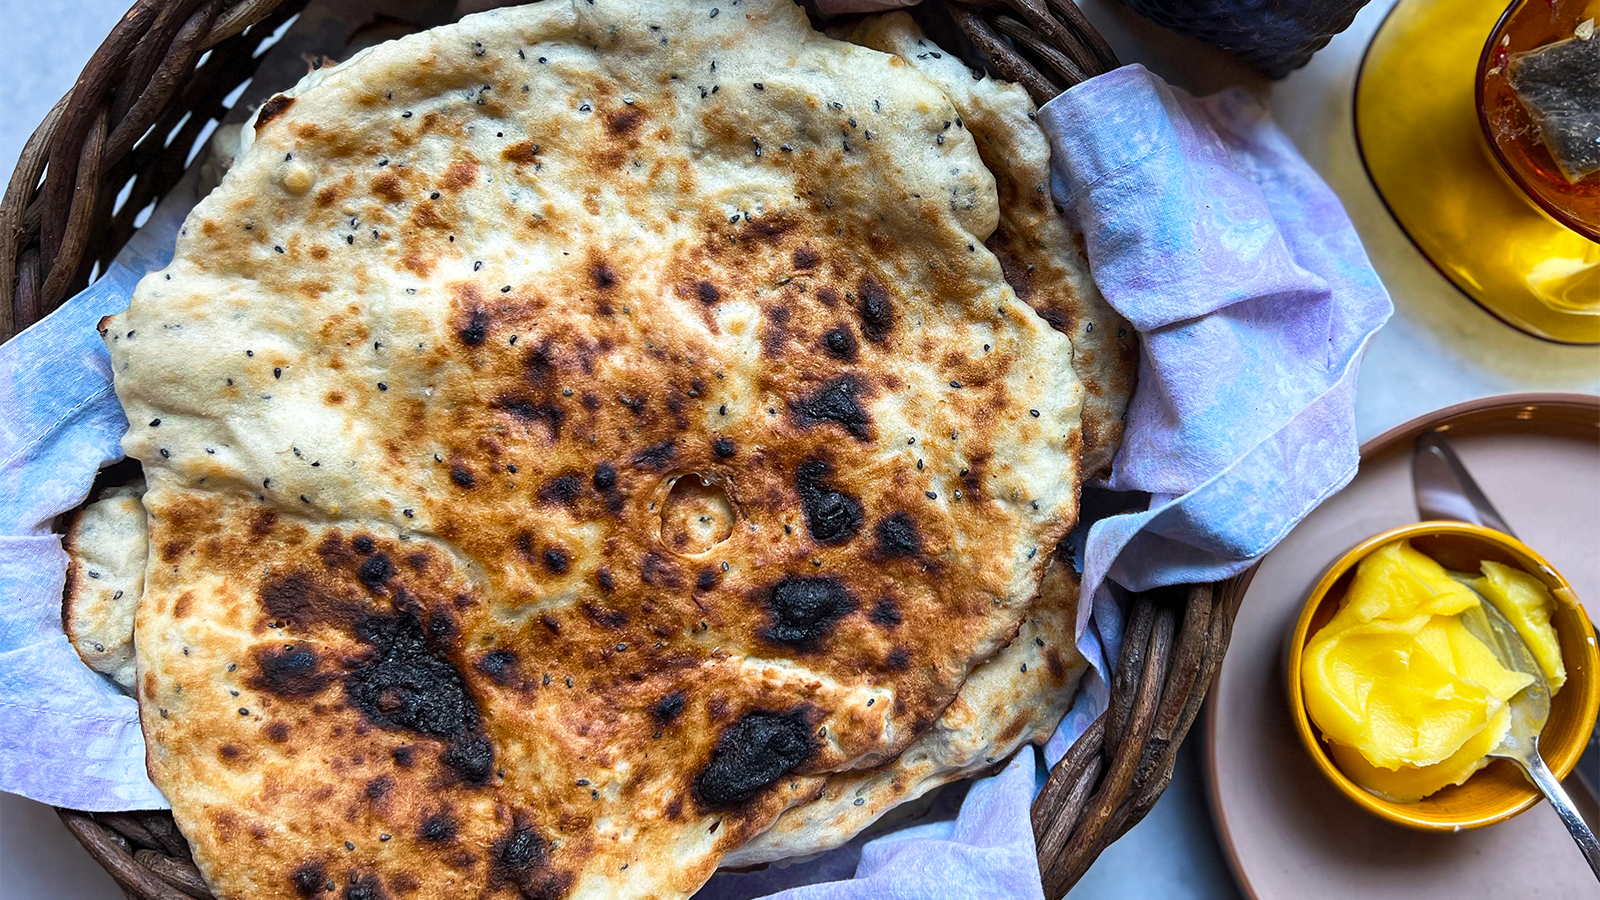
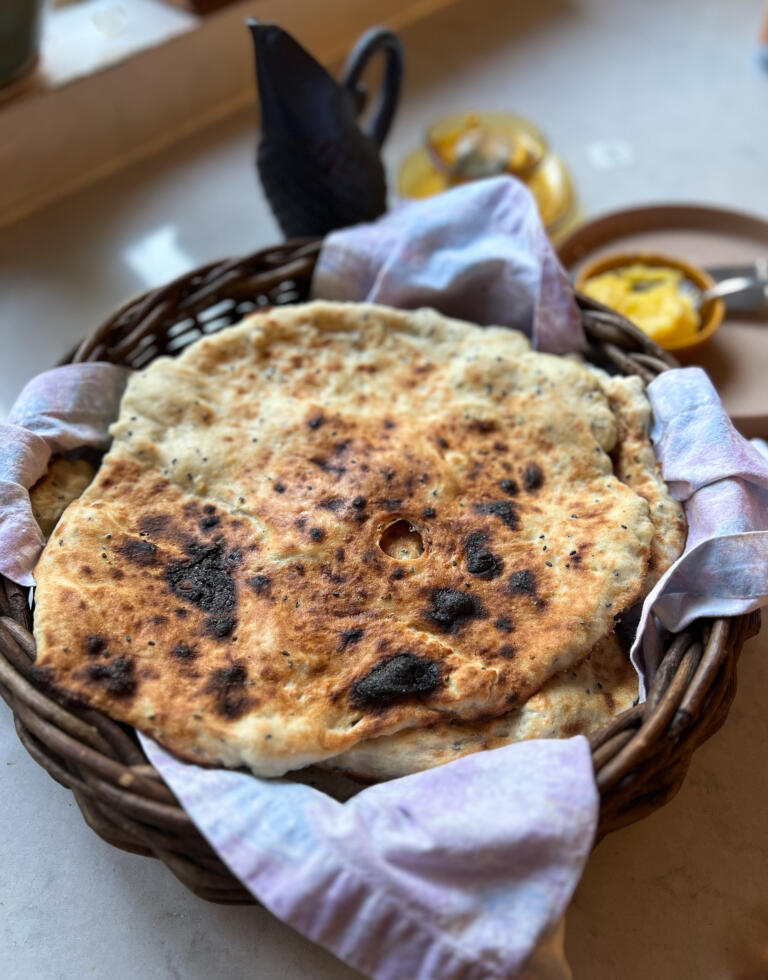
Saluf is a relatively thick and large (usually around 12 inches) flatbread. Traditionally, it was spiced with ground fenugreek seeds although nigella seeds are more popular now. It is usually not flipped when baked, which results in a pastry filled with large bubbles of dough on the top, lightly charred from the coal of the taboon.
Saluf is one of three popular flatbreads in the Yemenite Jewish cuisine, along with lachuh and malawach. Flatbreads are popular all over the Middle East, too, from Iranian lavash to Arabic khubz, Egyptian kumaj and eish merahrah (also mixed with fenugreek) and Israeli pita. Remains of the earliest flatbread were found in Jordan and date back 14,400 years.
The Nosher celebrates the traditions and recipes that have brought Jews together for centuries. Donate today to keep The Nosher's stories and recipes accessible to all.
Israeli cookbook writer Moshe David, of Yemenite origins, told me that saluf is probably a Jewish name given by the Jews of Sana’a to the flatbread. Muslims simply called it khubz (“bread” in Arabic).
David also spoke about the saluf’s important role in Israeli falafel. While falafel stands existed in Arab communities in Israel for decades, it was the Yemenite Jews who first opened them in Jewish concentrations. Their version of falafel was very simple: The falafel patties were smaller than those sold by Palestinians, and were served with chopped salad and zhug (a Yemenite spicy condiment) in saluf, which they made smaller and adjusted to include a pocket. That’s how thick, fluffy Israeli-style pita was born, a direct descendant of saluf. It is quite different from the Arab pita popular across the Levant. To this day, the thickest pitas in Israel are known as “Yemenite pita.”
Saluf has enjoyed a moment in the spotlight over the last few years, with Israelis of all origins and ages baking it at home, the same way that Pini still does. This doesn’t only mean that you get the freshest version of this tasty bread (and that you can impress your friends endlessly), but it also allows you to flavor the saluf to your liking, be it with fenugreek or nigella seeds.
Some lucky folk have a taboon in their backyard, just like Pini does. But most improvise with an electric skillet; or bake saluf in a regular skillet on the stovetop that’s covered with an electric skillet or with two electric skillets, one on top and one at the bottom. The idea is to make sure the flatbread is baked in high heat on both sides at the same time. In this recipe, we’re using a pizza stone, a baking sheet and the broil setting of the oven to get the taboon effect.
The saluf dough contains much more liquid than a regular pita dough, resulting in a very sticky dough that’s harder to stretch using a rolling pin or flip in the air like pizza dough. The common practice is to wet your hands and stretch the dough in the skillet itself. If a taboon is used, the dough is first stretched over a round padded tool and then stuck to the side of the taboon to bake. The saluf is brushed with water (sometimes spiced with fenugreek) immediately after it’s placed in the skillet, and is baked only for a few minutes, until the top inflates in some areas.
It is wonderful to consume immediately, while still warm and so soft. Serve it with soup, as Pini does, or with tahini, labneh or anything else you use regular pita bread for.
Yemenite Jews ensure that even old, dry saluf doesn’t go to waste. They crumble it up and add it to chicken soup with hilbeh, warm yogurt soup or make a sweet version with samneh (fenugreek-spiced clarified butter) and honey.
Note: Saluf is best consumed immediately after baking, and it will keep well for a few hours covered with a towel. To save it for later, it’s best to freeze the saluf in freezer bags then brush with a little water before reheating at 325°F for about 10 minutes.
Yemenite Saluf Recipe
This thick, slightly charred flatbread goes with absolutely everything.
- Total Time: 2 hours and 35 minutes
- Yield: 6 12-inch flatbreads
Ingredients
- 2¼ lb all-purpose flour (you can substitute half with whole-wheat flour)
- 2 Tbsp dry yeast (preferably SAF instant dry yeast)
- 2 Tbsp sugar
- 5 tsp kosher salt
- 1½ Tbsp nigella seeds
- 1 tsp ground fenugreek seed (optional)
- 3½ cups warm water
- 1 Tbsp olive oil
Instructions
- Put flour, dry yeast, sugar, salt, nigella seed and fenugreek in the bowl of a stand mixer fitted with the dough hook (or in a large bowl) and mix briefly. Add water and knead with the mixer or your hands for about 3 minutes, until a sticky dough is formed. Add oil and knead 1 minute longer. Cover bowl with a towel or plastic wrap. Put in a warm place in the kitchen (for example, on top of the stove) and let rise for 45 minutes, until the dough has doubled in volume.
- At this point, put a pizza stone in the oven about 4 inches from the broiler and preheat the oven to 475°F. (You will need to use the broiler setting later.) It takes an hour for the pizza stone to be fully heated; in the meantime you can continue making the dough.
- Deflate dough and knead inside the bowl for about 1 minute (you can use your hand or a spatula), then cover the bowl again and let it stand for 20 minutes. Repeat this step twice, then let the dough rise again for 20 more minutes – this time do not deflate the dough! The dough should rise a total of four times.
- Have a large (preferably thin and light, not the colored fancy-shmancy one!) baking sheet ready. Have a trivet ready on the countertop, next to a medium bowl with water, oil spray, an oven mitten and the dough.
- Turn the oven broiler on. Preheat the baking sheet on the pizza stone in the oven for 3 minutes.
- Take the baking sheet out of the oven, put on the trivet and spray with oil. Wet your hands and gently cut a large ball of dough from the bowl. Wet your hands again, then gently stretch the dough as you rotate it in your hands. When it becomes too difficult to stretch, put the dough on the baking sheet. Use your hand to coat the top with a little water (it will make it easier to stretch) and stretch the saluf a little further while it is on the baking sheet. Preferably, the saluf should be about ⅛-¼ inch thick, and it’s ok if it rips a little.
- Use oven mitts to transfer the baking sheet to the oven and place it directly on the pizza stone. Close the oven door and broil for 2-3 minutes, until it’s golden at the bottom and the top is a little charred. Check after each minute to see that the saluf is not charring too quickly, as every broiler is different.The first couple of saluf may be over or under cooked, but keep on trying! They’re going to be delicious either way!
- When the saluf are ready, remove them from the baking sheet, transfer to a plate and cover with a clean kitchen towel.
- Repeat the process (direction 7) with the rest of the dough. There is no need to preheat the baking sheet after each time, and no need to spray the baking sheet with oil again, unless the saluf start to stick to it.
Notes
Saluf is best consumed immediately after baking, and it will keep well for a few hours covered with a towel. To save it for later, it’s best to freeze the saluf in freezer bags then brush with a little water before reheating at 325°F for about 10 minutes.
- Prep Time: 10 minutes + 2 hours 5 minutes to rise
- Cook Time: 20 minutes
- Category: Appetizer
- Method: Baking
- Cuisine: Yemenite

Have you ever used sourdough to make these instead of the yeast? Just made my starter and going down the rabbit hole making breads.