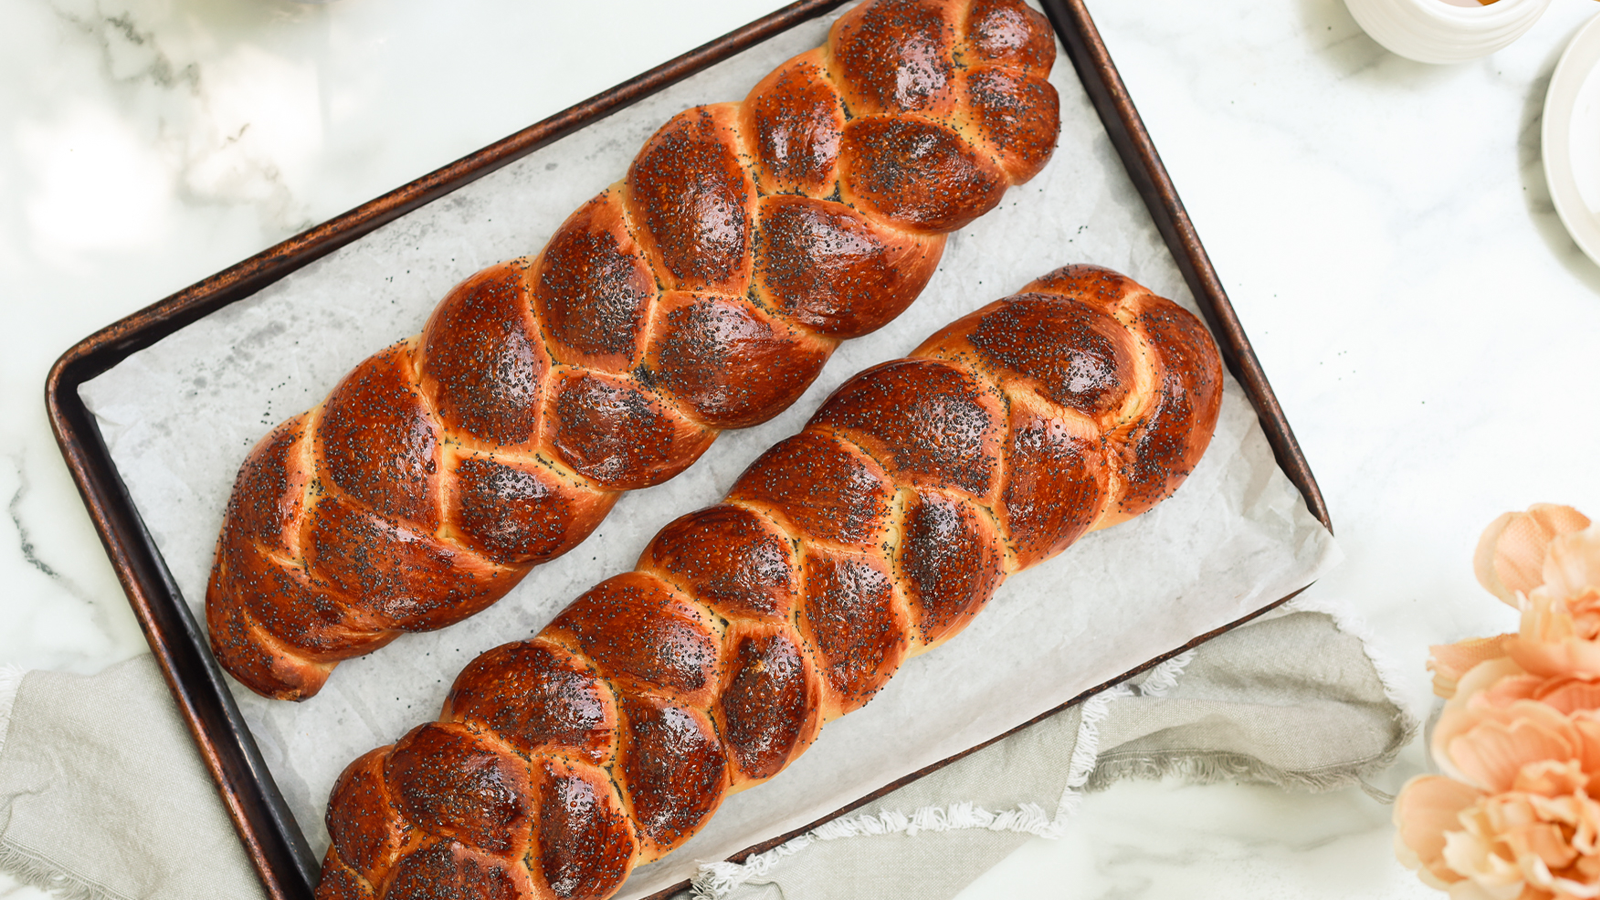
With its shiny, golden crust and soft, chewy crumb, this sourdough challah will be a welcome addition to your baking repertoire. By replacing the traditional yeast with sourdough starter, the dough takes on a subtle but distinctly sour backbone. But that sourness is not just for flavor. The fermentation process leaves the dough rich in easier-to-digest nutrients.
To make this challah, you’ll first need a sourdough starter. Starter is simply a mixture of flour and water, in this case equal parts of each, that are allowed to ferment at room temperature for a period of time. You’ll know that your starter is ready to bake with when it’s light, bubbly and has the consistency of a sticky, melted marshmallow when stirred. This can take a few days or a couple of weeks, but it’s worth the wait.
This dough needs to rise twice: first for 8-10 hours, then 2-3 hours on a countertop or in the refrigerator overnight. The dough can be made in the morning, baked at night and eaten the following morning, but when it comes to eating the freshest and most flavorful sourdough challah, I recommend doing the second proof overnight in the fridge. The bread is best eaten on the day that it’s made, but will keep, covered with a kitchen towel or stored in a paper bag at room temperature, for a couple of days.
Notes:
The Nosher celebrates the traditions and recipes that have brought Jews together for centuries. Donate today to keep The Nosher's stories and recipes accessible to all.
- For best results, ensure all ingredients are at room temperature and use a scale for measuring out ingredients.
- Loaves can be frozen whole in tightly-sealed freezer bags or sliced and frozen in singles. Single slices toast up beautifully to make breakfast sandwiches or a delicious piece of toast. Thaw whole loaves at room temperature before serving.
Sourdough Challah
Perfect if you already have a starter sitting in your fridge– try this tangy challah!
- Total Time: 21 hours 30 minutes
- Yield: 2 loaves
Ingredients
- 300 g (2 cups) all-purpose flour
- 330 g (2⅓ cups) bread flour, plus a bit more as needed
- 1½ tsp fine sea salt
- 100 g (1½ cup) bubbly, active 100% hydration sourdough starter
- 170 g (¾ cup) warm water
- 3 whole eggs, at room temperature, divided
- 1 egg yolk
- 75 g (6 Tbsp) sugar
- 100 g (½ cup) olive oil, plus more for coating the bowl
- poppy or sesame seeds, for topping (optional)
Instructions
- Day 1 (Morning): In a medium bowl, whisk together the all-purpose flour, bread flour and salt. Set aside.
- In the bowl of a stand mixer fitted with the paddle attachment, mix the starter, water, 2 whole eggs, 1 egg yolk, sugar and olive over low speed until just combined.
- Switch the attachment to a dough hook and keep the motor running on low. Gradually add in the flour mixture until a shaggy dough forms. You will need to scrape down the bowl a few times to help it along.
- Increase speed to medium and knead for 5-6 minutes, or until the dough is soft and pliable and pulls away from the sides. If the dough is sticking to the bowl, use a dough scraper to scrape it off and use your hands to form it into a ball. The dough should be soft, pliable and tacky, but not sticky. Put it back into the bowl to knead a couple of more minutes with the dough hook. If the dough is really sticky at this point, add additional bread flour a tablespoon at a time with the mixer running on low. Only add additional flour once the previous spoonful has been incorporated and you can see how the dough is transforming.
- Scrape dough onto a clean countertop and shape into a ball. Transfer to a well-oiled bowl. Roll it around so it’s lightly coated in oil, then cover and proof in a warm environment (between 70-85°F) until doubled in size, about 8-10 hours.
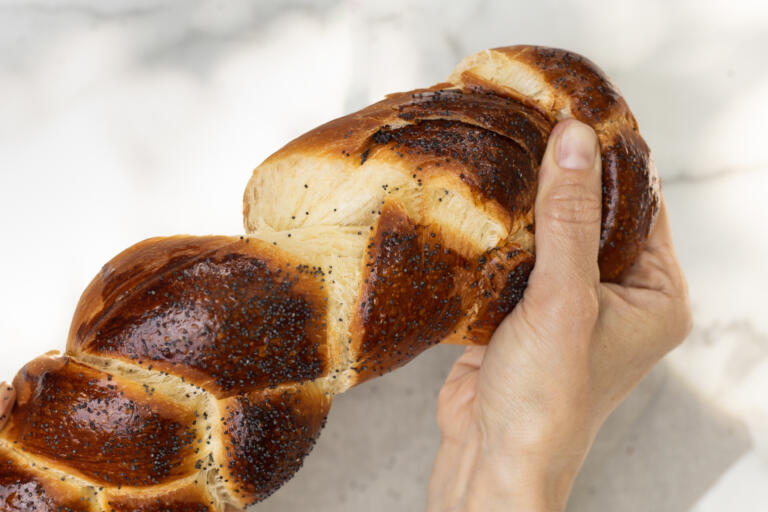
- Day 1 (Evening): Press down the dough to deflate, then transfer it onto a clean countertop, using a dough scraper if necessary. Divide the dough in half (about 580 g each), then divide each half into three equal pieces (about 193 g each). Cover the dough with a damp towel and rest for 15 mins to relax the gluten. Don’t skip this step.
- Prepare a baking sheet with parchment paper. Then, using your hands and the friction of the counter, roll out each piece of dough to an 18-inch strip (or rope). Divide the strands in half so you have two sets of three. If your dough is still shrinking back at this point, let it rest another 10 minutes before continuing.
- Braid each loaf of challah, sealing and tucking pieces in at each end. Place the braided dough on the prepared baking sheet, spaced equally apart. Cover with plastic wrap and a warm, damp tea towel and proof in the fridge overnight. The dough will be puffy and, when poked, will take on a slight indent that springs back slowly. To bake the same day, cover with plastic wrap and a warm, damp tea towel and proof about 2-3 hours on the counter then skip to step 10.
- Day 2 (Morning): Remove dough from the fridge and let it come to room temperature for 1-2 hours before baking.
- Preheat oven to 375°F. Whisk the remaining egg and brush it evenly over each loaf. Sprinkle with sesame or poppy seeds, if using.
- Bake for 25-30 minutes, or until dark brown and shiny.
- Transfer to a cooling rack to cool slightly before serving.
Notes
- For best results, ensure all ingredients are at room temperature and use a scale for measuring out ingredients.
- Loaves can be frozen whole in tightly-sealed freezer bags or sliced and frozen in singles. Single slices toast up beautifully to make breakfast sandwiches or a delicious piece of toast. Thaw whole loaves at room temperature before serving.
- Prep Time: 1 hour + 20 hours proofing
- Cook Time: 25-35 minutes
- Category: Bread
- Method: Baking
- Cuisine: Jewish


Is it possible to make this challah without all the added sugar?
Yes, you could leave the sugar out of the recipe for this.
Can this be made egg free? What’s your substitution suggestion?
Hi Rae, we have not tested this particular recipe without eggs, but this vegan challah recipe and this turmeric and maple challah recipe are both egg free.
Do you suppose this would work with gluten-free starter and flours?
If you have experience working with a GF starter and GF flours for bread baking, then yes give it a go. If it is your first time, we would suggest going with a tried-and-true GF challah recipe like one of these.
So are saying that this dough proofs for 8 hours on the counter then gets braided, and put into fridge overnight to be baked the next day,
This was really delicious. Very complex flavor while still tasting like a challah. Pretty simple if you’re used to working with a starter.
This is a 6 strand braid for each loaf that is 9” long?
This recipe yields two 3-strand, 9-inch loaves.
I love this recipe
First time making Challah! This was the best bread I’ve ever made! My dough was pretty sticky to work with when braiding so I had to roll it in flour a little to make my strands.
Is it possible to make this recipe using a bread maker instead of a mixer?
Hi Sue, we haven’t tried making this recipe in a bread maker but please let us know how it turns out if you do.
If I sub honey for sugar, should I up the flour?